
In this article
“The face is terrible.”
That was one of my reviews of an early Sundermarch character. A little blunt, perhaps, but accurate. We had a real 3D model. We could render it, turn it around and keep adding detail. It still felt a long way from the character on the card.
Sundermarch is a tactical card game built around positional combat across five opposed columns. My ambition for its 3D gameplay is a gorgeous battleground where the characters feel as though they belong to their illustrated world. The painting, shadow, atmosphere and identity of each faction need to survive the move into three dimensions.
Getting there has involved some lovely surprises and some fairly horrible faces. It has also given us a process worth sharing.
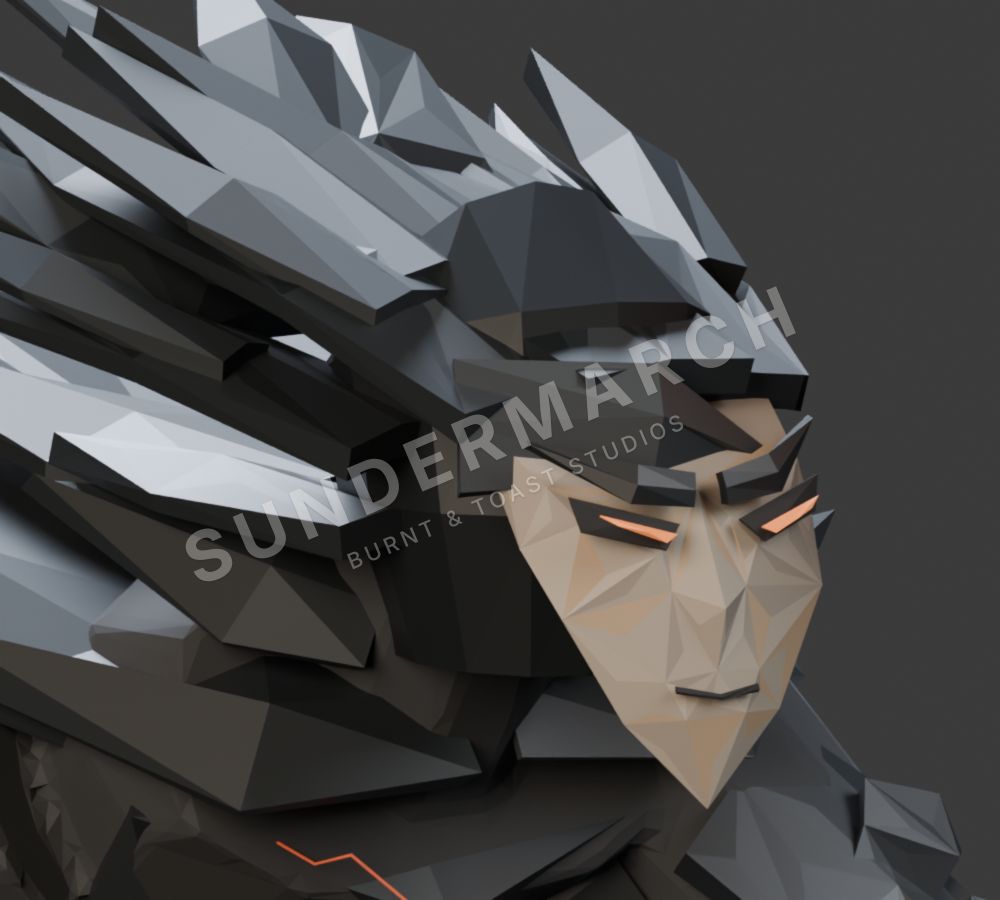
An early Cinder refinement, rendered from actual geometry. Adding detail had not resolved the face or captured the card’s character.
View larger imageAgree what “right” looks like
Our early Cinder work was built in Blender. The mesh improved through several passes, but the same underlying problems kept returning: harsh facial construction, repeated shards, bright highlights in the wrong places and a pose that lost some of the original energy.
I asked whether Blender was the problem. Could we use something different? Could the result genuinely become smooth and faithful enough that the model and the card felt almost interchangeable?
What helped was agreeing what the character should look like before doing more work on the mesh.
Starting from the card, we used OpenAI image generation to develop a finished-looking character reference. This gave us something specific to judge: the face, silhouette, pose, materials, flame and overall atmosphere. Once I approved it, we preserved that exact image as the target for the modelling work.
At this point, we had an approved 2D picture. We still had to build a 3D model that looked like it.
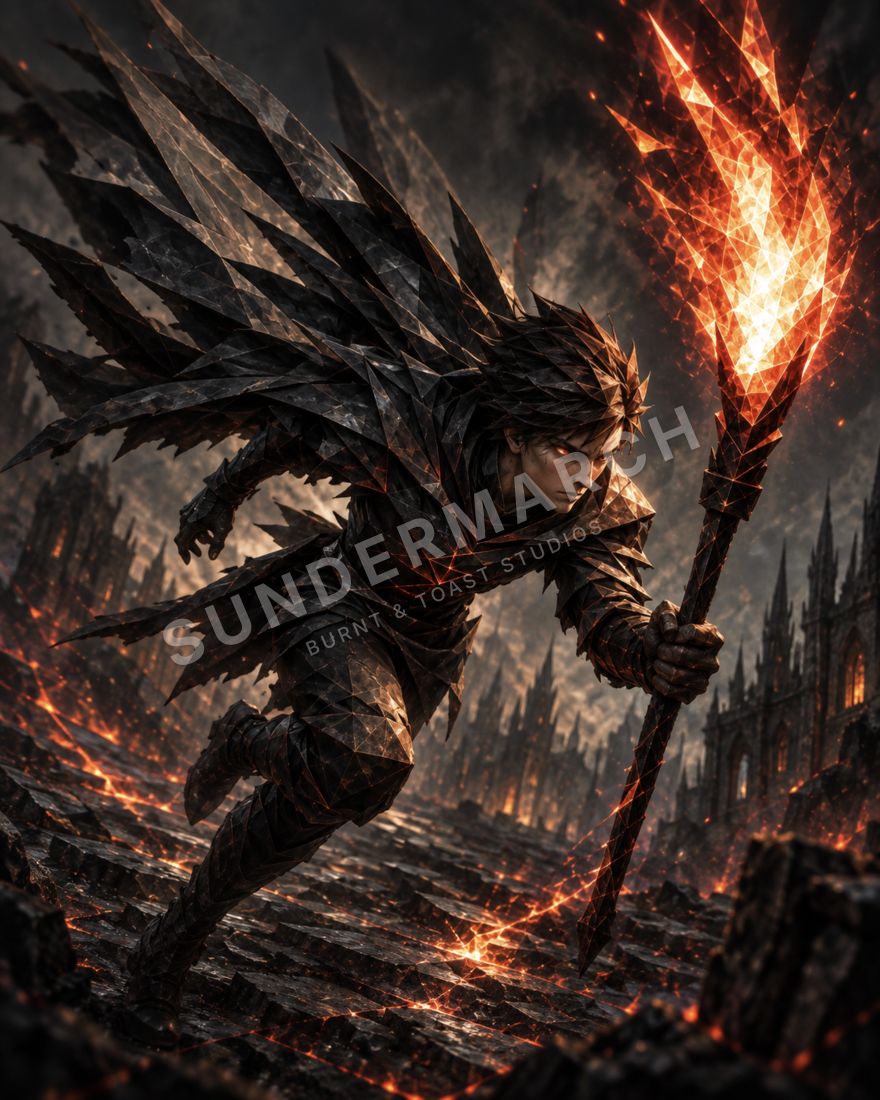
The approved Cinder visual target: a generated 2D reference, not a render of the completed mesh. Keeping that distinction clear prevented an attractive picture from being mistaken for a finished asset.
View larger imageWe then made more reference views to work out how the character would fit together. These needed reviewing too. A supposed side view can drift into a three-quarter view. A hand can change position. Clothing can acquire new details between images. An attractive sheet is not automatically a consistent modelling guide.
The original card remained the source of character identity. The approved reference clarified how we wanted that identity translated. Anything hidden in the original image needed to be treated as an interpretation.
Give each tool a specific job
Our working setup brings together several tools.
- Codex coordinates the work, prepares and runs scripts, organises references, checks outputs and records what changed.
- OpenAI image generation helps establish the visual target and supporting studies.
- Meshy generates starting geometry and textures through its API.
- Blender is where we inspect the actual object, repair geometry, refine materials, build the ground and render the evidence.
- Unity is the gameplay destination, where assets must eventually work with the battle camera, lighting, interaction and device constraints.
- Notion holds the tracked tasks, decisions, approvals and results.
Meshy made it possible to get much closer to a useful starting form. Blender remained essential because we needed to understand and control the actual model. A generation could be strong overall while still containing a fused prop, an invented face or a poor join.
I’ve been judging whether each result feels like the character I want in Sundermarch. Those reviews have been quite specific: the head looks squashed; the neck bulges from the side; I cannot tell whether the rear leg is kicked back. Each observation gives the next pass something concrete to resolve.
Repair the defect you can explain
Cinder taught us a great deal about assembly and viewing angles. A head could look promising in isolation and sit badly on the body. A successful front view could conceal an awkward neck profile. The running pose needed to make sense from behind as well as from the card’s original angle.
Eventually, those individual corrections came together into the Cinder Acolyte artwork I approved: the forward movement, layered dark cloak, torch and bespoke scorched ground. This is the actual model we reached, rendered in Blender.
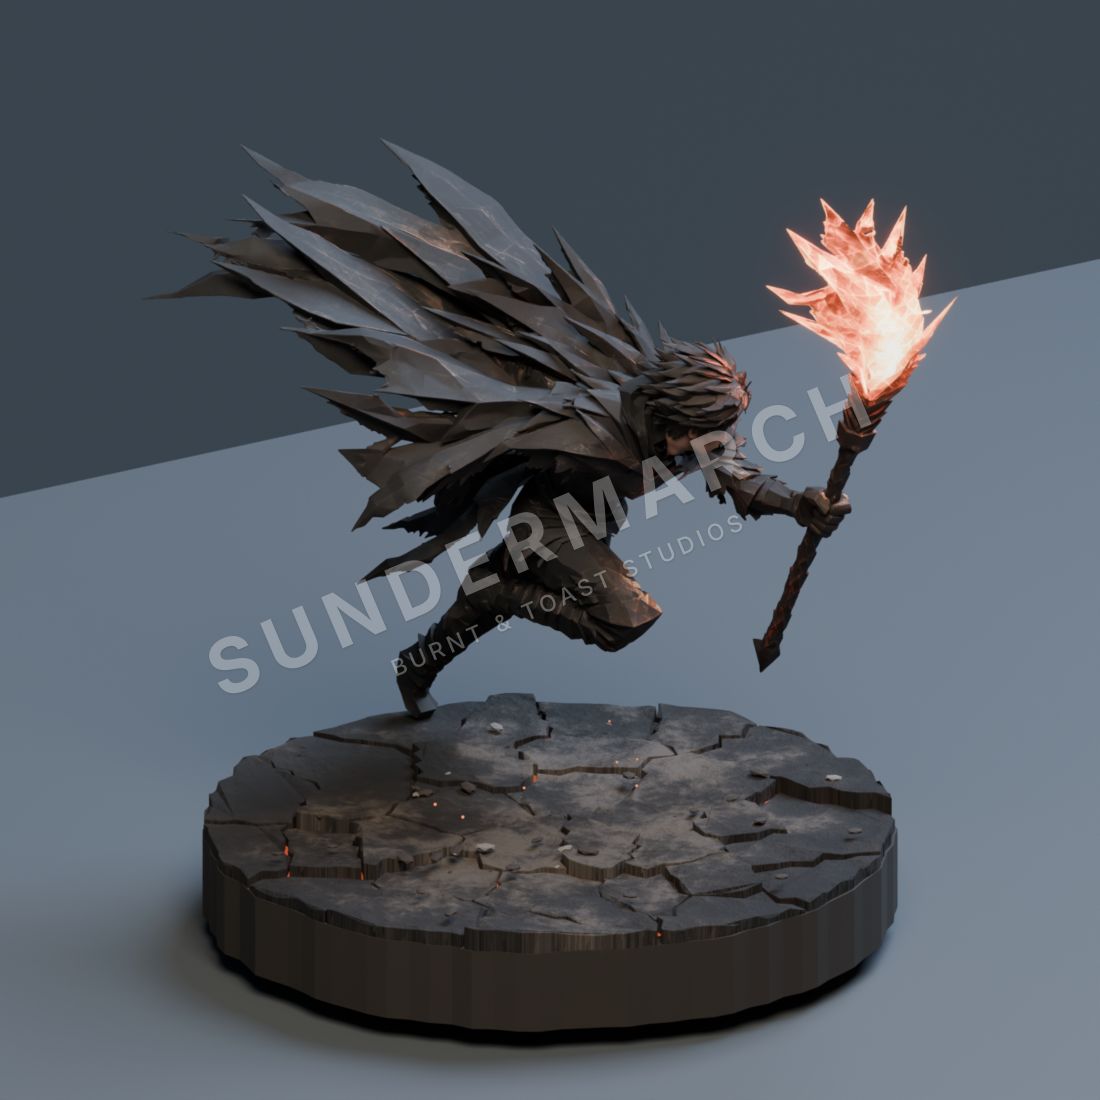
Cinder Acolyte’s approved finished artwork, rendered directly from the 3D master. Diagnostic board markers are hidden for this presentation; the character, ground geometry and materials are unchanged. Gameplay and device validation remain separate.
View larger imageThe process became more reliable when we stopped treating every disappointment as a reason to generate everything again.
Now we describe what looks wrong, work out what might be causing it and repair that part. Then we look again. We keep the parts that already work.
Reefling needed that approach too. A chest and underside repair needed more than smoothing over an awkward surface. An attempted correction stretched the mesh into a sheet. The boundaries needed to be understood and repaired properly. We used a brightly lit underside view so darkness could not politely conceal an opening.
My advice is to give the model an unflattering inspection. Neutral light, rear views, side views, underneath, feet and contact points. The dramatic hero render has its place, but it cannot answer every question.
Test the framework on a different character
Ironbark Warden was an encouraging next test. Its identity depends on very different things: a staggered leaf-like shield, a tower-shaped helm, ironwood structure and rooted forest ground.
The first geometry and texture attempt translated those features well enough to reach review without a corrective regeneration. For Ironbark, the references had done their job. I’ll need more characters through the process before I can say whether it saves time or money overall.
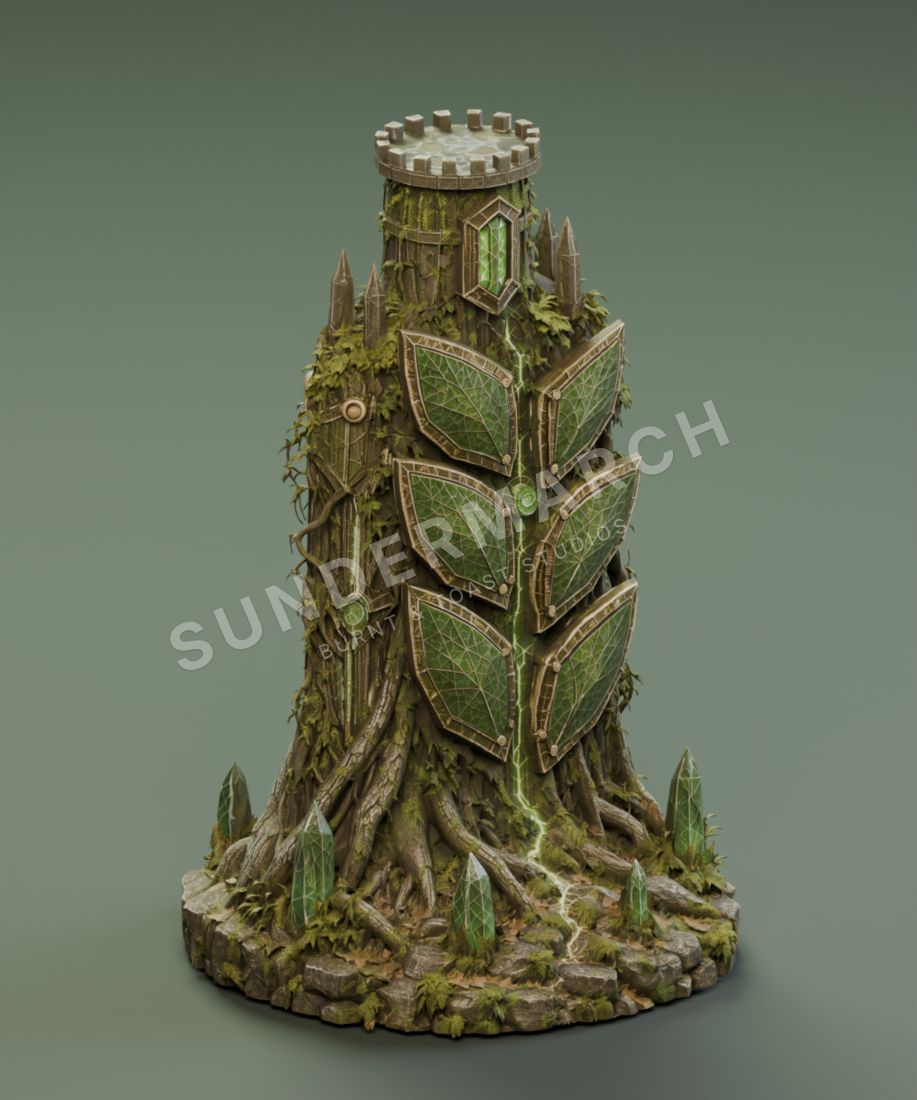
Ironbark Warden, rendered from the actual 3D candidate. Its first geometry and texture attempt reached review without corrective regeneration.
View larger imageThe Wayfarer Scout provided a sterner test. The hood, concealed face, blade, lantern, clothing and leg relationships all needed care. Some generated interpretations introduced features we did not want; others joined things that needed to remain separate.
We followed the same steps, but the Scout needed more repairs. A reusable process doesn’t make every character the same amount of work.
Check what a texture pass gives back
The Scout produced one of our most useful technical lessons.
After the sculpt repairs, we submitted it for a texture pass. The returned model had been rescaled and its triangle count had fallen from 220,306 to 219,514. The geometry we had carefully repaired was no longer exactly the geometry we had sent.
That was what happened on this run. I don’t yet know how often it happens.
We diagnosed the changed scale and position, then transferred the generated paint onto the original sculpt. Some small areas required approximate texture-coordinate mapping, which we inspected closely. The character retained all 220,306 original triangles, with zero measured vertex displacement.
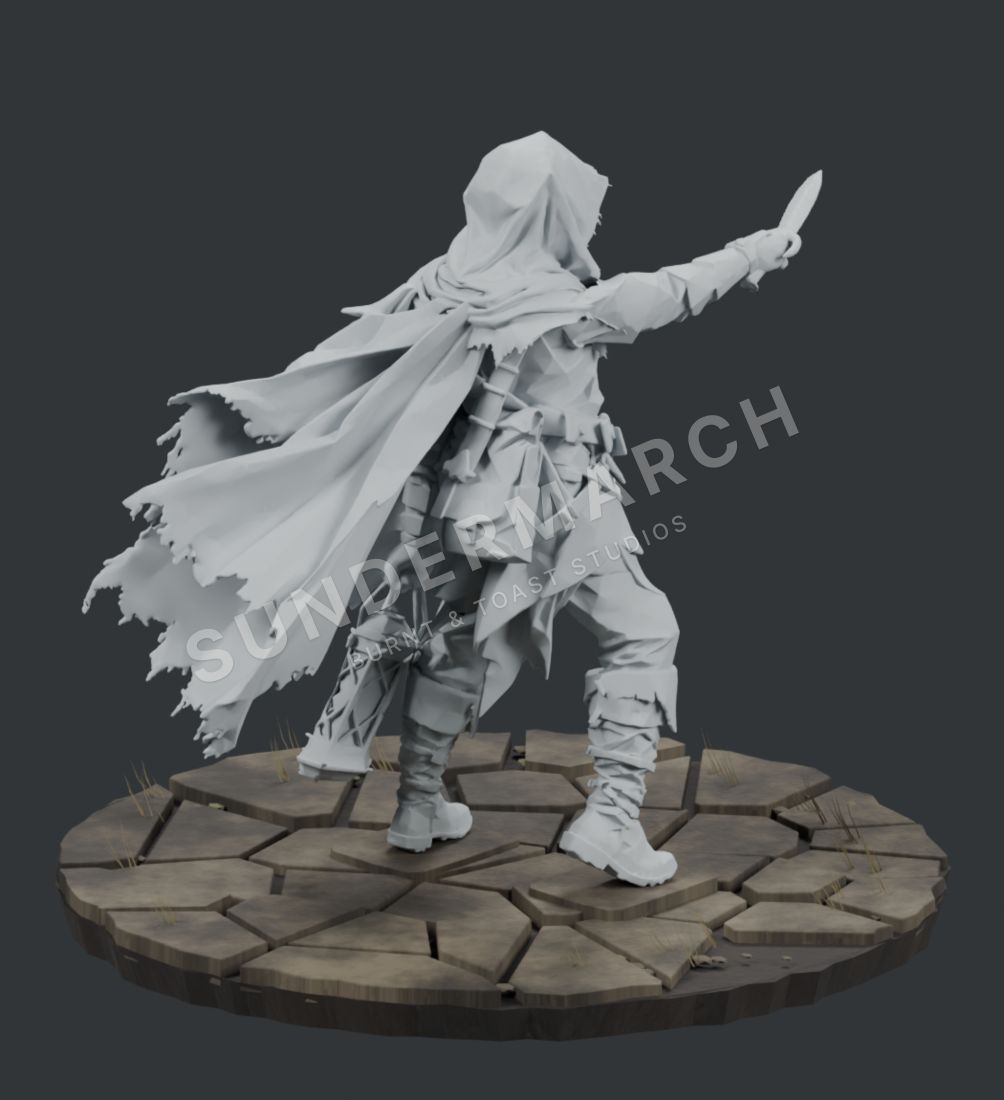
The repaired Scout before painting. This was the geometry we wanted to protect during the material pass.
View larger image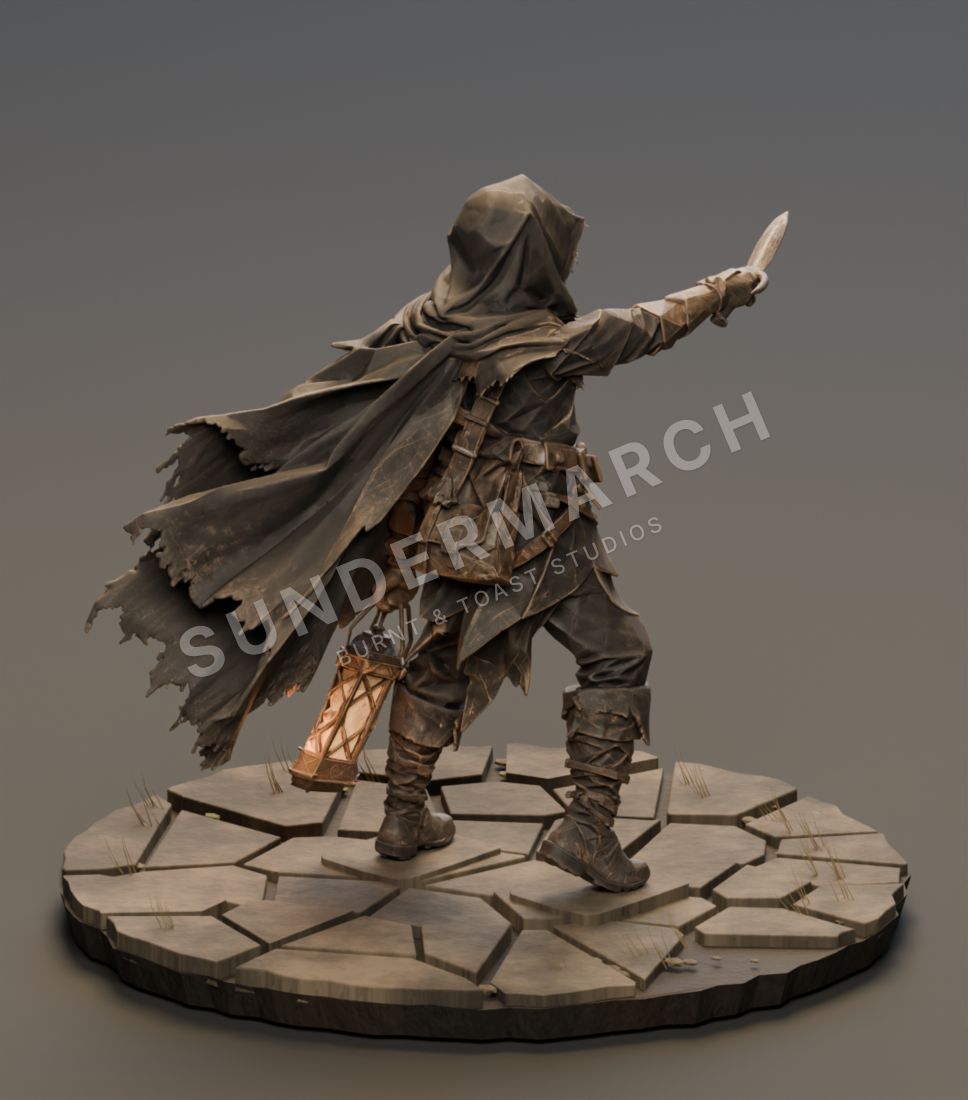
The current painted Scout, rendered from the actual 3D model in Blender. It is an art candidate awaiting final appearance approval, not a Unity gameplay screenshot.
View larger imageThe lantern needed another local correction. An initial glow treatment produced angular bright patches across the surface. We rejected that pass and replaced it with a continuous baked emission mask inside the lantern cage.
The measurements showed that we’d kept the sculpt intact. I still had to look at the lantern and decide whether it worked.
Make the ground part of the character
As Cinder came together, I realised I wanted each character’s base to be unique, faction-aligned and suggestive of living, breathing ground.
That led to scorched basalt, ash and embers for Cinder; tidal ground for Reefling; a rooted forest setting for Ironbark; and broken road and vegetation for the Scout.
The ground helps carry the character’s atmosphere into the battleground. It also needs practical discipline. The feet must meet it convincingly, the silhouette must remain readable, and the overall footprint must respect the game board.
At this stage, that sense of life comes from sculpting, materials and composition. Moving vegetation and other environmental animation are separate work.
The steps I’ll use for the next character
For anyone following a similar route, this is the sequence I would carry into the next character.
- Start with the card and the constraints. Record the original art, identifying features, intended pose and gameplay camera. Separate visible facts from details that need interpretation.
- Approve the visual target. Resolve the look in a reference image before investing heavily in the mesh. Preserve the exact approved file and the instructions that produced it.
- Check the construction studies. Compare views for consistent proportions, pose, clothing and attachments. Record unresolved contradictions.
- Generate and inspect the real geometry. Review neutral and dramatic renders, front and rear, sides, hands, props, feet and hidden surfaces. Diagnose defects before retrying.
- Repair, paint and build the ground. Protect approved geometry. Make local changes where possible, then inspect what every transformation actually returned.
- Export and reopen the result. Check geometry, scale, orientation and texture integrity. Review both opposing board orientations using genuine rotation of the same model, never a mirrored substitute.
- Archive the evidence and test in the game. Keep editable masters, exports, references, prompts, rejected attempts, approvals and usage records. Follow with separate Unity and device validation.
The most useful habit is to write down what must remain unchanged before each pass. “Improve the Scout” is difficult to verify. “Keep the repaired pose, hood, boots and blade unchanged while adding the approved material treatment” gives us a much clearer test.
Costs and work still to do
We’re keeping a record of generation usage so we can see where the credits are going.
For example, the Scout’s recorded Meshy usage reached 60 credits: 25 for the original geometry, 25 for a separate hood generation and 10 for the final texture request. That is historical usage for this character, not a current price quote or an all-in production cost. It excludes image generation, coordination, review and local repair work.
Where we can measure it, we record work on each asset separately from the effort spent coordinating it. Anything we haven’t measured stays marked as unmetered. Otherwise, a cheap generation could hide a lot of repairs.
There is still an important distance between a beautiful art master and a finished mobile game asset. Cinder has reached Unity and WebGL proof work. The wider set still needs further integration, and native device performance, animation and final gameplay presentation have their own checks. A static model is not automatically ready for animation or 3D printing either.
We’ve now got more characters to work with, a clearer idea of the quality I’m after and a process I can use on the next one.
I’m delighted with how far the work has come. The next challenge is making that same character and atmosphere survive the actual battleground, at the size and angle a player will experience them. That was the ambition when I first complained about the face. It still is.
Preview the character brief
# Reusable card-to-3D character brief

Use this before generation, then update it after each accepted stage. An image approval and an asset approval are separate decisions.

## Source and intended use

- Character / faction:
- Original card reference and version:
- Approved visual target and exact file:
- Intended use: art study / gameplay / animation / print:
- Camera, viewing distance, target devices and board footprint:
- Features visible in the card:
- Hidden features that require interpretation:

## Character identity

- Silhouette and relative proportions:
- Pose and weight-bearing contacts:
- Face, expression or deliberate concealment:
- Distinctive clothing, armour, props and attachments:
- Materials, palette, shadow and faction atmosphere:
- Unique ground treatment:
- Features that must not change:
- Unresolved decisions and who approves them:

## Construction and generation

- Checked front / rear / side studies:
- Contradictions between references:
- Chosen generation route and tool:
- Requested model/settings; separately record verified settings:
- Approved inputs and spending scope:
- Exact prompt, input versions, output version and usage evidence:

## Review each candidate

- Identity against the source and approved target:
- Neutral-light front, rear, both sides and underside:
- Face/hood, hands, props, feet and joins:
- Ground contact and board footprint:
- Real opposing rotation of the same model:
- Intended gameplay-camera readability:
- Texture and lighting artefacts:

## One repair at a time

- Visible defect:
- Suspected cause and evidence:
- Targeted correction:
- Geometry/materials that must remain unchanged:
- Specific comparison or measurement that will show success:
- Result; accept, reject or escalate with a diagnosis:

## Export and handover

- Editable master and checked export:
- Reimported scale, orientation, bounds and geometry comparison:
- Embedded textures, colour spaces and material comparison:
- Any approximation or known visual limitation:
- Source/reference provenance and rejected versions retained:
- Owner appearance approval for this exact version:
- Unity/material validation:
- Device performance, animation, interaction and accessibility checks:
- Printing checks if separately commissioned:
- Remaining work and authoritative task record:

## Usage

- Generation credits and currency, if known:
- Image-generation usage, if known:
- Worker settings and separately observed usage:
- Coordinator overhead, if known:
- Unmetered review/rework; do not invent totals: